

Design Team ~A Bunch Of Love By Ian Rump-Smith
- Ian Rump-Smith
- Feb 7, 2024
- 3 min read

Hello Fellow Crafters!!!!
Well the month of Love is here, so I thought another Valentine card inspiration may be needed.
For this project, my inspiration was Jamie Rodgers Teabag Folding Collection.
Step 1
I started with a 6x6 card base; this is personally one of my favourites to work with!
Taking a piece of white card, I cut out a 'stitched square' die cut for my background.
I created my background using my Make Art Stay-tion along with Creative Expressions Scattered Hearts Stencil.
I secured my stencils and card with the magnets, and then used a blending brush with my Distress Oxide Inks - Spun Sugar and Saltwater Taffy (this colour is gorgeous by the way).

I did a slight gradient with the lightest colour, and then added the darker pink to the bottom part of the stencil.
I love to create shades in my stencilling, rather than just having solid sometimes. I find it adds a bit more dimension to the design.

Once completed, I 'mat and layered' with some matt gold card, and then using double sided tape adhered to the front of my card.
Step 2
Next I used Jamie Rodgers' Mini Shapes - Teabag Die Set and the Forever & Always mini paper pad and cut 8 die cuts.
Mix your papers up to give a patchwork effect flower :-)
📝 NOTE - You can use larger dies and shapes in the Collection, however if you do this, ensure you have a larger card base in order that your flowers fit.
Put 2 of the same sheets together (as it makes it a little quicker to cut) and do this 4 times with different sheets from your pad.
Folds are simple for each flower.
The fold lines are already on the cut so first I made all those folds.
Next I did these folds.


I did this for all 32 pieces ~ don't worry it really isn't as time consuming as you think.
Once done, I glued them together to make each flower.
I then also cut some thin leaves from a sheet of Dovecraft green card and carefully folded down the middle of each one to give effect.

Step 3
For the next step I had to think how to do the flower wrap. I thought of ribbon, lace and even jute!
Why not use a sheet from the paper pad and I figured a way to make it look effective.
I took a sheet from the pad and scored a "Y" shape on the back and then cut the "V" out.

I used a little Distress Oxide on the reverse and made a small cut on the "V'" point before folding it over. I then folded the bottom part in a concertina and was happy with the result.
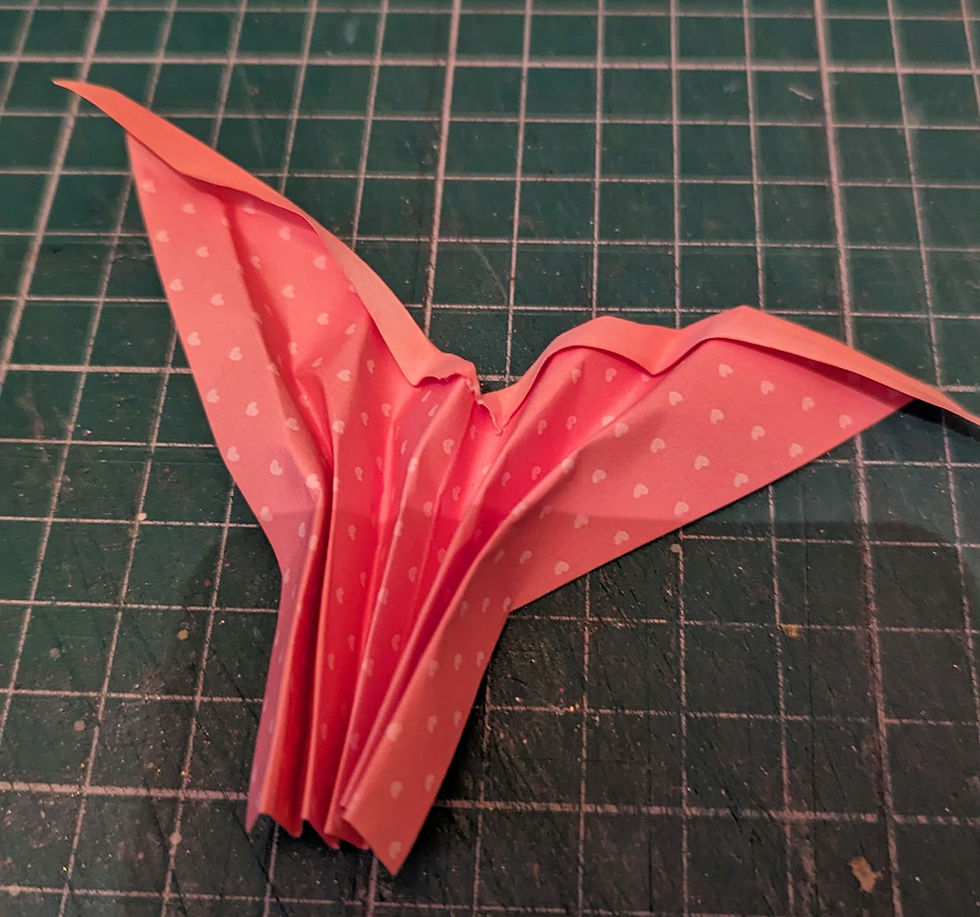
I put a little glue in-between each fold and then held for about 30 seconds.
I glued to the card base with tacky glue.
I then adhered a few of the leaves randomly inside the wrap.

Step 4
When I put the flower down, I just didn't like the 4 random flowers as they looked quite tight.
So I decided to cut one of the flowers up to give a look of more flowers in the bunch.
I used a foam pad behind 2 of the flowers, so I had room to slip in my 'NEW" cut one.
I added the rest of the leaves in the front of the wrap.
For extra effect, I used coloured Dew Drops to the centre of the flowers.

I chose the word Valentine's my sentiment from Jamie Rodgers' Sentiments Collection - Essentials 3 Set; trimming off the 's.
I used a deep purple colour so it stood out, which I then glued to the bottom left of the card front.
This was finished off with a tiny bow on the flower wrap.

A nice, yet simple card that could be used for any celebration by changing the colours and sentiment!!
Let me know how you get on ..... share with us on our Facebook Group - Create With Craftmania And Jamie Rodgers.
Have a great week and thanks for reading my blog, means so much.
Take care
Ian x
Craftmania Shopping List.......
Set A Below - Is a Larger Die Set Than Set B
CARD
Also Available
INKS
GLUES & ADHESIVES
CRAFT TOOLS


Love this, so 3d and colours are gorgeous too (ali carubia) xxx