

Design Team ~ 3 Peak Arrow card by Lynn Lewis .
- LYNN LEWIS

- May 4, 2024
- 3 min read

Hi Crafters,
Well last week I had my monthly crafty meet up with Wendy again and this time she brought the project with her .
Her husband made up the instruction sheet and she has kindly said I can share it with you all on here .

Step 1:
Check out this 1st picture above, click on it then expand it, then you can see it better and it’s all self explanatory.
Take a piece of base colour card and follow the instructions in picture 1.
Hopefully you can see in picture 2 that I have done mine !

Step 2:
As seen in picture 3, fold your base card like this and cut out the back band and sentiment/topper holder .

Step 3:
Cut your patterned and plain pieces as seen in picture 4.
I chose the stars sheet from the Patterned card sheets kit as it’s non directional, and also a purple card to blend with it .

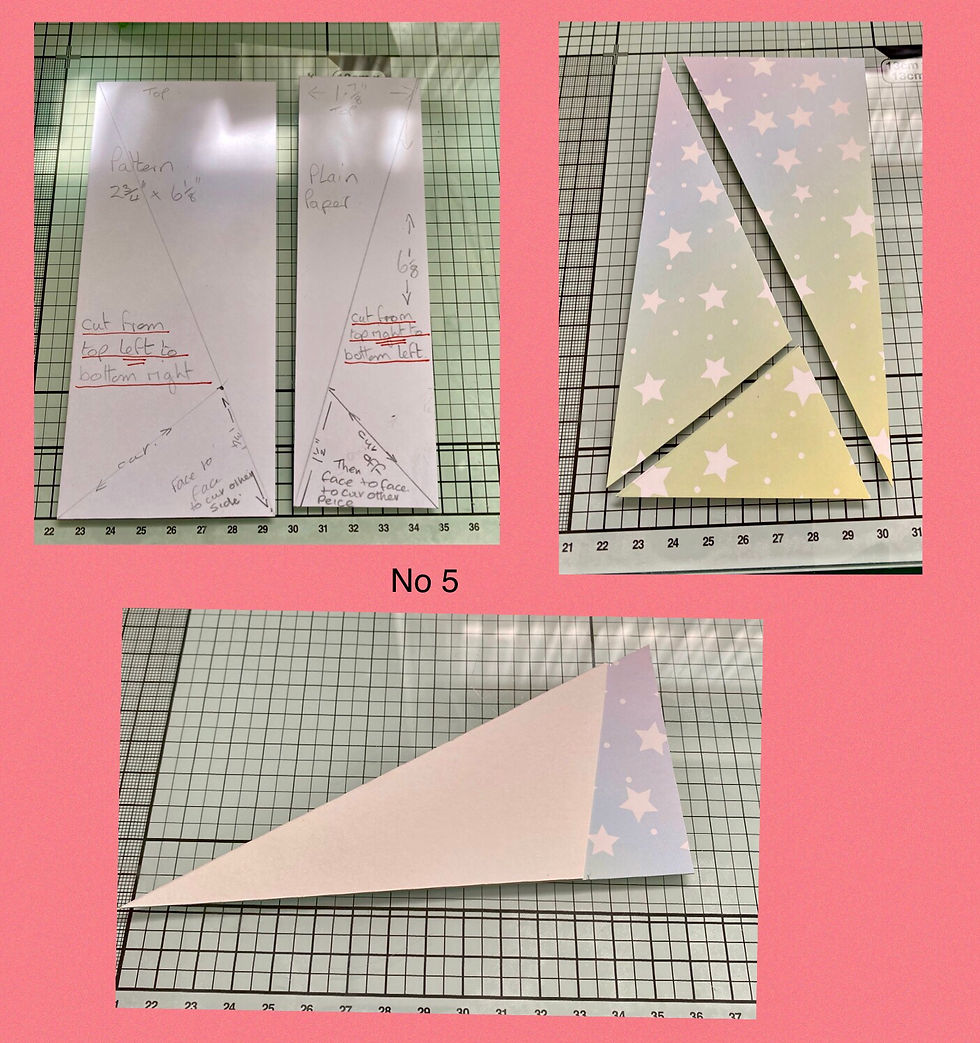
Step 4:
Now cut out these pieces in picture 5.
As you can see, you need to cut a piece of patterned card like the above - it’s 2 & 3/4 x 6 & 1/8 inches.
Then cut it from top left to bottom right and take the piece on the left and mark up the sloping side 1 & 3/4 inches from the bottom, mark it, then draw a line from the mark to the bottom corner and cut this piece off .
To do the other side you now need to place them face to face as seen and cut off the extra bit, as you can see it’s not the same as the other side but it just works !
Step 5:
As in picture 6, now cut out the plain coloured pieces very similar to the patterned pieces only the other sides.
So cut a piece 1 & 7/8 x 6 & 1/8 inches then cut this top right to bottom left .
Now take the bit on the right and measure up the sloping side 1 & 1/2 inches from the bottom then draw a line from the mark to the corner as seen, then cut off, then as above and place these face to face and cut off the extra.

Step 6:
You can now stick all your panels on and put the back support in as seen in picture 7.
The larger plain triangles are to stick on the back to cover the support piece sides. Sorry I forgot to take a pic of that but you can see where they go on the bottom pic of no 7 on each side.

Step 7:
Make up a topper / sentiment for the card as seen in picture 8. I just went for a matching one for demonstration using the Fairy wishes sentiments but you can do whatever you like here stamping - die cuts - flowers anything.
You can bling it up or not - the choice is yours.
Stick the sentiment support on the card as seen, then stick your topper on.
When dry you can fold it down and as you can see it will go in a envelope.

I think this card would be great for a teenager.
I hope I haven’t missed anything out.
Thank you Wendy for your instructions :)
Until next time,
Happy crafting!
Lynn x


This is so clever and will give this a go. Thank you fro showing.
You are more than welcome. It was a fun day crafting and I enjoyed making this card with you x