

Design Team ~ Card Folding Fun By Lynn Lewis
- LYNN LEWIS

- Mar 9, 2024
- 5 min read

Do you like to craft with friends?
Well, a few days ago I had my crafting buddies round with me and I made up a Z - Fold Pop Up Box Card template for them both, along with black card bases to set them the task to do with it as they wanted….
We had a great time :-)
So let’s get started on mine and I’ll share Wendy’s with you a little later!
Step 1
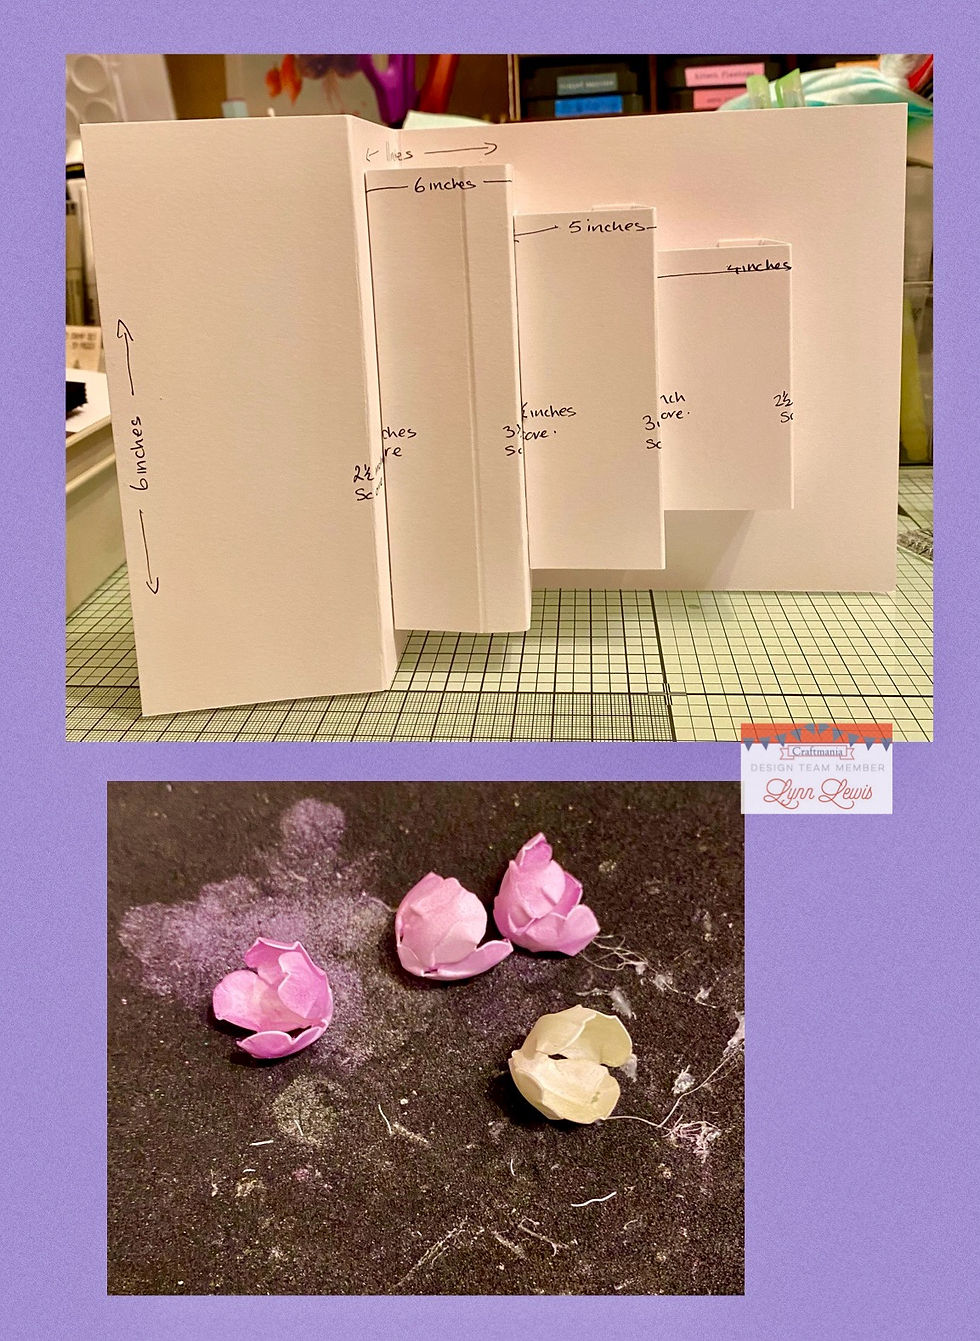
As you can see in the first picture, I’ve made up white templates to keep for future reference.
These have the size of each piece of card with the arrows and where to score each piece are the other measurement.
If you zoom in, you will see it better but I will add the measurements here just in case!
▪️Card base piece . 11 Inches x 6 inches and score at 2½ inches and 5 inches.
▪️1st box. 6 inches x 5 inches and score at 2 inches and 3½ inches and 5 ½ inches.
▪️2nd box . 5 inches x 4 inches and score at 1½ inches and 3 inches and 4½ inches.
▪️3rd box . 4 inches x 3 inches and score at 1 inch and 2½ inches and 3½ inches
So that is the measurements for the body of the card and I suggest you do as I have done and make it up as a template for future reference and as you can see I also made one up so I could see how it went together on the third picture so ignore the writing on that !

Step 2
Now you have all the measurements, cut it all out in black card (as seen above 📸)
Score in all the lines.
The next task is to choose your papers to cover it.
Here I opted for Jamie Rodgers’ Tranquil Garden Paper Pad.
I picked a sheet that had a script on for the background of the card, and a contrasting piece for the others. I only used one sheet of each in 8x8” paper.
So these are the measurements you need to cover the above pieces with ..
▪️Card base piece. Back panel 5¾ inches x 5¾ inches .
▪️Middle panel 2¼ inches x 5¾ inches.
▪️Front panel 2¼ inches x 5¾ inches.
✏️ NOTE - For the Boxes - you only cover the two middle panels on all boxes.
▪️1st box. 1¼ x 4¾ inches and another at 1¾ inches x 4¾ inches
▪️2nd box 1¼ inches x 3¾ inches do two of these.
▪️3rd box. 1¼ inches x 2¾ inches and another at ¾ inches x 2¾ inches.
For the front panel you will also need an embossed piece of white card measuring 2 inches x 5½ inches. I’ve chosen this one below which is so versatile for different projects.
Now stick all the paper pieces onto the panels, making sure your boxes are the correct way up!
You can see in my second picture 📸 my centre box was not lol, but I got away with it ….

Step 3
Fold and burnish the score lines on the card base; fold the front one back and the middle one in like a Z-Fold card.
Now fold and burnish all the score lines on the boxes and place the largest box in first.
Stick the largest uncovered side to the middle panel of the card centring on to that panel.
✏️ NOTE - Before you stick the other side down, fold the card down as if you’re closing it so you glue the other blank side down in the correct place. Let that dry a little and then follow the same process with each box, folding each one down to as you go so the card will fold down and open up with no problem.
When you have done this you will now have a card measuring 6 x 6 inches and it will fit lovely into a 7x7 envelope depending on how you decorate it .
In my case it needs a box lol!
Step 4
Now to decorate the card….
As you can see I’ve used this gorgeous Spellbinders Peony Flower Die Set again which you may have seen in my previous blogs. It’s fast becoming my favourite although you wouldn’t know it lol :-)
You can find all the flower die sets / foliage in the 🛒 Shopping List below.
The Grand Butterfly is from Creative Expressions Wings Of Wonder Collection and the smaller ones are from the Lattice Heart Blossoms die set Everlasting Love Collection.

I have used all three of the Mica Magic palettes to colour the above elements and get the shades required for this card. I do confess, I’m a little addicted to these Mica Magic sets as they are so easy to use and colour up so quickly...
Flowers
I’ve made up the Peony in "my style" - we all have one for our flowers, and I also made up two little buds. To do this, just use the smallest flower dies and shape them (as seen📸) and then stick them together with a hot glue gun holding tightly whilst they dry. Or if you have a quilling board you can pop it in one of those to hold it.
Butterfly
The Grand Butterfly has a piece of white vellum on the back so it doesn’t get lost in the background.
Now stick on all your flowers first with a hot glue gun and tuck in the foliage with your
Cosmic Shimmer Dries Clear Glue.
✅ TIP - Stick on the butterflies, closing the card before attaching them so they don’t get trapped in the folds.

Step 5
Finish with a sentiment and pearls.....
I've used the sentiment from Fluttering Ivy (Fairy Wishes Collection) - use one of your choice.
I cut it out in white and then backed it with a scrap piece of fussy cut purple card, before sticking it onto the first box.
✅ TIP - The pearls in the Butterflies are from my stash, however don’t forget you can colour plain ones with alcohol marker pens.
Below is a picture of my card folded up so you can still see all the elements.
It’s great to mix up all those Collections we have, to do different things!
If like me, you built the front up high, here are my box measurements.
▪️Box Measurements - 11 inches x 11inches scored at 2¼ inches all round.

So.. as promised..
Wendy gave me permission to add her card that she made during our crafty get together and add to this blog post for you!
As you can see, she has gone in a totally different direction and made an amazing Christmas card with the same base.
For her papers she used the Arctic Wonder Paper Pads and Jamie's Rippled Poinsettia with Cosmic Shimmer Twinkles - Aurora. (🛒 See the below Shopping List)
The sentiment is from the Christmas Pierced Collection and the foliage from her stash, which she has also coloured lightly with Mica Magic... plus a few pearls!

We thoroughly enjoyed making these cards and had a fantastic day.
I certainly hope you will have a go at this too. If you love dimensional card construction, be sure to check out Jamie Rodgers YouTube Channel, where he has a playlist of tutorials for you. The link is below.
I'd love to see your ideas so be sure to share with us on our Facebook Group - Create With Craftmania And Jamie Rodgers.
Have a fun crafting week
Take care
Lynn x
FLORAL DIE SETS
CARD / PAPER / PAPER PADS & ACCESSORIES
Also Available
Also Available
MICA MAGIC SAVER BUNDLES & INDIVIDUAL PRODUCTS
OTHER PRODUCTS
GLUE & ADHESIVES
CRAFT TOOLS
OR


It was a great time getting together and crafting , just like old times. I really enjoyed doing this card. And was nice to see how different themes looked on the cards. X